
*I write more about the “Scanner Pro” app further along.
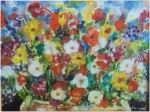
I painted this about 20 years ago, and still remember how much I enjoyed the whole process.
I used pan watercolours mixed with a clear gel medium and painted thin translucent layers of colour onto canvas.
Back then, I had a young family and no studio space to set up an easel. A larger painting on canvas had to be tackled on the kitchen table (or on the back verandah). The gel allowed me to get a textured painterly effect (I do also, love the traditional use of watercolour) without having to use, acrylics or oils – not the ideal paint, for use in a kitchen!
I had fun covering the canvas with flowers, building up layers of colour tinted gel, until the painting glowed…a little like an egg tempura effect. In a previous post – in the second painting along (of a mother and baby sleeping), I’ve used this method and it shows a subtle glow.
As the saying goes “necessity is the mother of invention” – I devised this method, to get the outcome I wanted; within the means available. 🙂 Actually the word “mother” is quite appropriate: mothers often have to be inventive to get something done – other than housework!
Nowadays I do have more space (and time) for my arty purposes; but I don’t need much, as I usually work fairly small. I often work on a portable table resting on the side of an armchair or on my knees; also a nice fit for my iPad studio.
*Just touch on one of the paintings to enlarge them all.


It’s great how a scanner app, turns my iPad into a scanner. There’s a few apps to choose from; presently I’m quite happy with “Scanner Pro”.
The “Scanner Pro” app, does a great job picking up: colours, tones, line work…
- Once you have taken a photo while in the app,
- you then, either touch on “select all” or “find borders”, where you can move around white guide lines till you find the part of the scan you want to focus on and crop it. This will of course, then exclude the rest of the scanned picture.
- You set it for either: letter, A4, business card, auto…and so on. I usually use auto..then press “done”.
- Next you adjust the degree of contrast and light wanted…and once more press “done”.
There’s quite a few places you can send your scan to: email, print, dropbox,..etc. I take my scans to the “Photo” section on my iPad, where I have created various albums for my artworks.
Update 2023: I now make my own prints of some of my art – you can read more about it on my page: “Printing iPad and Traditional Art”. *There’s also more info about apps I use on my page, “Some App Information”.
Have a great day!


What a nice painting you have there, Janette… Totally inspiring! 🙂
LikeLiked by 1 person
Thank you! 🙂
LikeLiked by 1 person
Very pretty
LikeLiked by 1 person
Thank you! 🙂
LikeLiked by 1 person
Just downloaded Scanner Pro on my new iPad Air2, J. It will be perfect for the work tasks I need in to finish the next few days.
LikeLiked by 1 person
Meant to add – thanks for the tip, Janette. As ever, you’ve done all the hard work and research first, so I can go straight to what I need to do. Thanks again for your great tips.
LikeLiked by 1 person
Thank you. Glad to be of help. You are sure to have fun with your new iPad Air 2!
LikeLike
This is a beautiful painting; colorful and cheerful! 🙂
LikeLiked by 1 person
Thank you…it was certainly fun to do! 🙂
LikeLiked by 1 person
I bet, painting is always fun! 😀
LikeLiked by 1 person
beautiful colours 🙂
LikeLiked by 1 person
Thank you Carmel. 🙂
LikeLiked by 1 person
This is gorgeous! So many flowers and colors all in Harmony!
LikeLiked by 1 person
Thank you, Tracy…I don’t think (so long ago!) I had any reference material, when I painted it, but it just seemed to flow and I had a wonderful time painting it. I’ve seen so many lovely flower drawings and paintings, since I started blogging, yours included. 🙂 It inspires me to do more; I have done a few. May try some starting off on paper and finishing them in an art app, like I did with the garlic and lemons. Love your pears! I can see you like to experiment in “Art Set Pro” (and in other media), as well. Really is an excellent app. It’s such a blessing to have so many options. So thankful for it. Have a great day! ~ Janette
LikeLike
Thanks for the tip about Scanner Pro, I have been looking for something like this. Will try it out.
LikeLiked by 1 person
Glad to be of help. It’s a great app. I think you will enjoy using it. 🙂
LikeLiked by 1 person
Beautiful! I am also a writer and artist, and I’m glad to have found your blog. I’ll be happy to see more of your posts in my reader.
LikeLiked by 1 person
Thank you! Glad you stopped by my blog…it gave me opportunity to have a look at your lovely blog, and I’m looking forward to seeing your posts in my reader! Have a great day. 🙂
LikeLiked by 1 person
Thanks for the follow and visit!
LikeLiked by 1 person